

Red Finger Sponge Care: Placement, Flow, Feeding and Water Quality
Invertebrate care · Detailed tutorial · About 9 minutes · Expert level
The key habit: Never expose a sponge to air at any point—not during acclimation, placement, or maintenance—because trapped air bubbles will kill the sponge's internal cells.
In this guide
- What a Red Finger Sponge is and why it's difficult
- Tank maturity and water quality requirements
- Placement and water flow needs
- Feeding and nutrition strategy
- Acclimation and introduction to your tank
- Signs of stress and troubleshooting
- Long-term care and monitoring
1. What a Red Finger Sponge is and why it's difficult
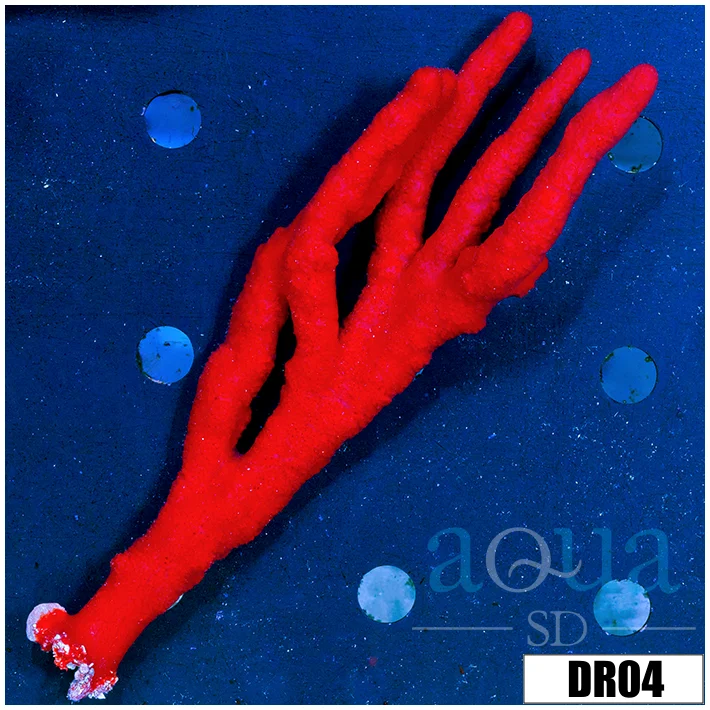
The Red Finger Sponge (Haliclona compressa) is a filter feeder that grows upward in a branching manner from a central trunk. Unlike corals with zooxanthellae (algae in their tissues), sponges have no photosynthetic ability. They eat by pulling water through tiny pores in their body and trapping microscopic food particles [1,2].
Red Finger Sponges are very hard to keep species and should only be attempted by the most expert of aquarists. The main challenge is feeding: the biggest reason that sponges are so difficult to maintain long-term in captivity is starvation. A sponge must, on average, filter approximately 275 gallons of water to capture enough food to gain three ounces of biomass. In a typical aquarium, this food is often absent or removed by protein skimmers and UV sterilizers.
2. Tank maturity and water quality requirements
The ideal environment for the Red Finger Sponge is a mature aquarium (preferably with an integrated refugium) that contains plenty of live rock and a constant supply of natural foods of varying size.
Maturity matters because established tanks develop populations of bacteria and microorganisms that sponges eat. Finger Sponges need to be kept in tanks with pristine water quality. It is essential to maintain high water quality, as sponges are sensitive to elevated levels of nitrates and phosphates. However, keep nitrates and phosphates low (Nitrate < 10ppm, Phosphate < 0.05ppm), but not at zero; a "sterile" tank is a starving tank for a sponge.
Stability is more important than perfect numbers. Swings of more than 2°F in 24 hours stress livestock more than a steady value slightly outside the target range. Changes to water chemistry should be made gradually: never raise alkalinity by more than 0.5 dKH per day; fast shifts cause coral tissue recession.
3. Placement and water flow needs
Placement: Bottom to Middle; Waterflow: Moderate to Strong. Finger Sponges should be placed in the bottom to middle of the tank and need low lighting and high water flow.
Moderate indirect water current is essential in keeping the sponge free of debris and in preventing algae or cyanobacteria from settling in the crevices of the sponge. The flow must reach the sponge itself; dead spots collect detritus that will clog it. Moderate, indirect water flow is ideal; make sure there is enough flow to keep any detritus from settling on the surface of the sponge.
Keep in a low light area; light causes algae to grow on them which will smother it. Unlike most corals, the Red Finger Sponge does not benefit from intense lighting. Place it away from the tank's brightest zones.
It is important to allow ample space around the Red Finger Sponge in mixed reef aquariums since it can grow rather fast under ideal conditions, potentially crowding or shading neighboring corals.
4. Feeding and nutrition strategy
The vast majority of sponges are nanoplanktivores, feeding upon the tiniest of plankton—this group includes bacteria and the smallest species of phytoplankton.
In an established tank with live rock and a refugium, natural food production may sustain a sponge. In a well-established reef tank with a healthy population of microorganisms, sponges can often obtain sufficient nutrition naturally. However, nanoplankton are the first to be removed/killed by UV sterilization and protein skimming, and then there is competition from other filter-feeders.
The Red Finger Sponge requires strong water flow and supplemental feedings of liquid plankton and other dissolved organic foods. Consider supplementing with phytoplankton, zooplankton, and other liquid planktonic foods to support sponge health and growth. Dose these foods 2–3 times per week, not daily; excess food degrades water quality and feeds unwanted algae.
One strategy is to stir the substrate to get the microfauna into the water column, making bacterial-rich sediment available to the sponge. This works best with a light touch and only if your tank can handle temporary cloudiness.
5. Acclimation and introduction to your tank
Gather before you start
- Clean, food-grade bucket (3–5 gallons)
- Airline tubing (4–6 feet long)
- Adjustable flow valve or knot in the tubing
- Timer
- Coral dip (commercial product, optional but recommended)
- Two containers for dipping and rinsing (if using a dip)
- Rubber gloves
- Pre-mixed saltwater at your tank's temperature and salinity
1. Never let the sponge touch air. The most critical concern is that it never be exposed to air; always keep sponges submerged in water. Ensure the store employee bags the sponge completely underwater; there should be no air pocket at the top of the bag, or at least enough water that the sponge cannot roll into an air bubble during transport.
2. Float the bag. Place the sealed shipping bag directly into your aquarium (or a container of tank water if space is limited) for 10–15 minutes to let the water inside warm to your tank's temperature.
3. Acclimate using the drip method. Move your warmed sponge into a small container where it can then be introduced to a steady stream of water from your reef tank; some aquarists will set up a drip acclimation system, releasing a slow but steady stream of water into the container. Adjust the valve so water drips slowly—aim for 2–4 drops per second. 30 to 40 minutes is an industry standard for the vast majority of corals and other marine life.
4. Dip (optional). After acclimation, a brief, gentle dip in a commercial coral dip may help remove parasites or algae. Soak the coral for 5–15 minutes, depending on the sensitivity and species. Because sponges are delicate, use a short dip time and handle gently.
5. Place in the tank. After acclimation and rinsing, carefully place the sponge on rockwork in its chosen location—bottom to middle, in a moderate-to-low light area with strong water flow. Do not bury it; let it attach to the rock surface on its own.
6. Signs of stress and troubleshooting
| What you notice | What to check next |
|---|---|
| Sponge is shrinking or losing mass | Insufficient feeding; increase supplemental plankton feeding 2–3× weekly. Check for starvation in a very clean tank. |
| Algae or cyanobacteria coating the sponge | Water flow is too low or light is too strong; move to a darker spot or increase flow. Algae outcompetes the sponge. |
| Sponge is brown or discolored | High nutrient levels (phosphate >0.1 ppm); perform partial water change and reduce feeding frequency. |
| Sponge tissue is pale or bleaching | Light may be too strong or water parameters unstable; move to lower light and check temperature, pH, and salinity daily. |
| Sponge will not open or appears closed | New stress from acclimation; allow 3–7 days in its placement before judging health. Moving it and changing conditions too frequently prevents healing. |
| Detritus collecting on or in the sponge | Flow is inadequate; reposition closer to a powerhead or increase circulation. Poor flow + poor feeding = sponge death. |
7. Long-term care and monitoring
Do not move the sponge frequently. After you have placed your Finger Sponge, watch for any signs of stress; if you see any signs of stress from your Finger Sponge, just move it slightly and watch for improvement. Major moves are traumatic.
Test water regularly. Sponges are sentinel animals; if a sponge declines, it often signals a water quality issue before other corals show symptoms. Test alkalinity, calcium, pH, and salinity weekly. Nitrate and phosphate should be checked every 2 weeks.
Avoid UV sterilization if possible. UV kills the bacteria and phytoplankton the sponge eats. If you must use UV for other reasons, run it on a timer so that the display tank gets a plankton-rich phase at night.
Monitor for sponge-eating fish. Finger Sponges should not be kept with fish that eat sponges like some species of angelfish.
Expect slow growth. Sponges are not fast-growing like many soft corals. Over months to years, with excellent care, a healthy sponge may double in size. This is normal.
Your care log
Placed on: ____________
Location in tank (depth / light level): ____________
Water flow direction: ____________
Feeding schedule (days per week): ____________
First supplemental feed date: ____________
Salinity on placement: ____________
pH on placement: ____________
Alkalinity (dKH): ____________
Notes on initial placement / behavior: ____________
Sources
Checked October 18, 2026. Reference addresses are plain text.
- LiveAquaria, "CCGC Aquacultured Photosynthetic Plating Red Sponge", https://www.liveaquaria.com/product/3540/?pcatid=3540
- Oceans Garden Aquaculture, "Red Finger Sponge", https://www.oceansgarden.com/product/red-finger-sponge/
- TankStop, "Finger Sponge (Ptilocaulis sp.)", https://www.tankstop.com/coral/sponges/finger-sponge-ptilocaulis-sp/
- Reeflings, "Red Sponge (Clathria mima)", https://reeflings.com/species/clathria-mima
- Algae Barn, "Sponges in the Marine Aquarium", https://www.algaebarn.com/blog/saltwater-aquariums/sponges/sponges-in-the-marine-aquarium/
- Build Your Aquarium, "How to Acclimate Corals to Your Reef Tank", https://www.buildyouraquarium.com/coral-acclimation/
- Bulk Reef Supply, "ECC Blue Plating Photosynthetic Sponge", https://www.bulkreefsupply.com/ecc-blue-plating-photosynthetic-sponge-eye-catching-coral.html
- Rate My Fish Tank, "How to Care for Marine Blue Sponges", https://www.ratemyfishtank.com/blog/how-to-care-for-marine-blue-sponges
- Aquarium Keeping, "Marine Sponges: The Filter Feeders of the Deep", https://www.aquariumkeeping.co.uk/reef-keeping/marine-sponges-the-filter-feeders-of-the-deep/