

Jebao GOW-15 Wavemaker Setup: Placement, Mounting and Controller Modes
Equipment · Detailed tutorial · About 12 minutes · Beginner friendly
The key habit: Start with a lower flow setting and gradually increase it over several days to allow your aquarium inhabitants to acclimate.
Shop the Jebao GOW-15 Wavemaker with Controller 1585gph Bluetooth & WiFi
In this guide
- What a wavemaker does and how it helps your tank
- Gather before you start
- Mounting the pump to the glass
- Positioning for healthy flow
- Using the controller and flow modes
- Adjusting for your corals and sand bed
- Monthly cleaning and maintenance
1. What a wavemaker does and how it helps your tank
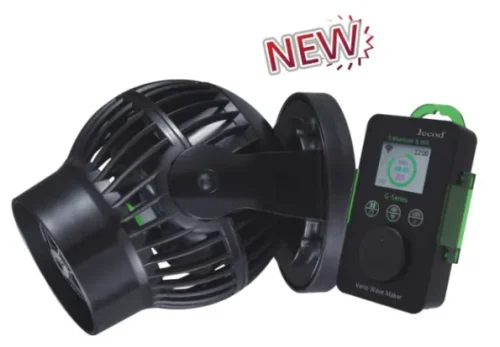
Jebao wavemakers simulate the natural waves and whirlpools found in a marine environment. Many corals rely on consistent water motion to deliver food and oxygen while sweeping away waste and preventing detritus buildup on their tissue. Aim for 5–10x display volume turnover from wavemakers, on top of any return-pump flow. A 200-litre reef wants 1000–2000 litres per hour of additional movement; a 400-litre system wants 2000–4000 LPH. The Jebao GOW-15 delivers up to 1585 GPH and uses a wireless multi-mode controller to allow adjustment of the wavemaker to suit your requirements.
2. Gather before you start
Gather before you start
- The Jebao GOW-15 wavemaker pump and wireless controller
- Power adapter with cable
- Clean cloth or paper towel
- Tank water for testing magnet strength (optional)
3. Mounting the pump to the glass
The wavemaker attaches with a powerful magnetic mount. Ensure the glass is clean and free of algae or debris where the magnet will be placed. Position the pump inside the tank and align the external magnet on the outside of the glass.
- Turn off and unplug the controller before assembly to prevent accidental activation.
- Clean the inside glass where the pump will mount. Use a clean cloth to remove any algae film, salt creep, or debris so the magnet grips securely.
- Place the pump inside the tank at your chosen location (see section 4 for placement details).
- Position the external magnet on the outside of the glass directly opposite the pump's internal magnet. The magnets will snap together through the glass.
- Check for secure mounting by gently trying to move the pump. It should not shift or rotate. If the magnet feels weak, the glass may be too thick or dirty—clean the glass again and try repositioning.
4. Positioning for healthy flow
Where you mount the wavemaker determines whether detritus settles or stays suspended, and whether your corals thrive or bleach.
Start by mounting the equipment on the longest side walls. Install the pump about one third of the depth below the surface, which generates a transverse current that flows through the entire volume and effectively sweeps all zones. Position the pump in the upper third of the water column, roughly 5 to 8 cm below the surface. High placement lets flow spread and drop naturally instead of firing straight into rockwork or substrate.
Angle it 10 to 20 degrees downward. Dead flat horizontal flow tends to hug the glass and create a fast lane along one wall. A slight downward tilt pushes water into the display and lets it bounce back diffused.
Aim for the opposite corner, not the opposite wall. Corner-to-corner flow travels further before it collides with glass and rebounds, which is what actually reduces dead spots.
For two-pump setups: Single wavemakers create dead zones on the opposite side of the tank. The minimum stable layout uses two pumps mounted on opposing walls, alternating in random pulse mode so flow direction reverses every 30–90 seconds. The shifting pattern keeps detritus suspended for the return pump and skimmer to remove.
Avoid these mistakes: You do not want flow pointed straight at a coral or at the sand bed; fine sand blows around and coral tissue gets irritated. Always leave a few centimetres clear in front of the pump.
5. Using the controller and flow modes
Once the pump is mounted and before turning on power, connect the cable from the controller to the pump, then plug the power adapter into an outlet (form a drip loop so water cannot run down the cord into the outlet).
The controller offers several flow modes. Coral and reef tanks generally respond best to sine wave or synced reverse modes. Each mode is programmed to different intensity levels. Start with a lower flow setting and gradually increase it over several days to allow your aquarium inhabitants to acclimate. This prevents corals from receiving sudden shock and fish from being stressed.
How modes work:
- Constant mode delivers a steady, uninterrupted flow at whatever speed level is set. Classic mode introduces gradual flow variation that loosely mimics tidal movement. Synced reverse mode alternates flow direction, creating a genuine cross-current effect. Sine wave mode produces smooth, rhythmic pulses that closely replicate natural wave action. Random mode generates unpredictable variation that keeps fish alert and corals fully extended.
Start in constant mode at 30–40% power for your first week. Once your corals are settled, switch to sine wave or random mode at medium intensity (50–60%) for the best reef health.
6. Adjusting for your corals and sand bed
After the wavemaker runs for 2–3 days, observe your tank:
Sand bed: If you're seeing dunes or exposed glass at the base, drop output 15 to 20 percent or raise the unit another few centimetres. Sand should shift slightly with gravel vacuuming, not migrate across the tank overnight.
Corals: Use random or reef crest mode, not straight pulse. Constant one-direction flow trains coral tissue to lean and can gas-bind SPS tips over time. Random modes cycle direction and intensity, which mimics natural surge far better than a fixed jet.
Dead zones: Sand-bed detritus piles indicate dead zones—relocate or angle a wavemaker to break up the trap.
If you see swirling detritus clouds that don't settle, the flow is too strong. Lower power by 10%. If detritus piles under rocks or sand sits still in one corner, move the pump to hit that dead zone or add a second pump.
7. Monthly cleaning and maintenance
Monthly maintenance is recommended to prolong your pump's life, which includes cleaning the rotor and removing dirt. Monthly cleaning prevents the calcium and algae buildup that degrades performance and shortens motor life. Unplug the unit, remove from the magnetic mount, and separate the pump head from the motor assembly. Soak the impeller housing, impeller, and shaft in a 1:3 white vinegar solution for 30–60 minutes to dissolve calcium deposits. Rinse thoroughly with fresh water, reassemble, and reinstall.
Safety note: Do not soak the motor or controller electronics. Always disconnect the pump from the power supply before cleaning, maintenance and protecting device.
In hard tap water areas, monthly cleaning is essential; in RO-based systems with low mineral content, every 6–8 weeks is usually sufficient.
What you notice and what to check
| What you notice | What to check next |
|---|---|
| No flow or very weak flow | Is the controller powered? Check the cable connection between pump and controller. Is the impeller clogged with algae or calcium? |
| Flow sprays everywhere and looks chaotic | Is the pump angled correctly (10–20 degrees down)? Is it mounted too low in the tank? Try raising it 2–3 cm. |
| Detritus piles in one corner | The pump is not hitting that zone. Rotate the pump angle, move it higher, or install a second pump on the opposite wall. |
| Corals look stressed or bending too far | The flow is too intense. Lower the power setting by 10–15%. Start at constant mode 30% if this is new. |
| White sand dunes forming on one side | The pump is angled too flat or aimed directly at the sand. Tilt it down more or raise it 3–5 cm. |
| Pump is making buzzing or grinding noise | The impeller may be jammed or dirty. Turn off power, remove the pump, and clean the impeller with vinegar and a soft brush. |
Your care log
Installed on: ______
Tank volume: ______ gallons/litres
Initial flow mode: ______ Initial power level: ______%
Opposite pump installed (if using two): Yes / No Date: ______
First adjustment (day 3): Mode ______ Power ______% Reason: ______
Last cleaned: ______ Next cleaning due: ______
Sources
Checked October 28, 2026.
- Jebao, "RW4 User Manual," manualslib.com https://www.manualslib.com/manual/1418535/Jebao-Rw4.html
- Jebao, "MLW Series Smart Wavemaker Pump User Manual," manuals.plus https://manuals.plus/ae/1005009545395032
- Jebao, "Smart Aquarium Wave Maker Water Pump Instruction Manual," manuals.plus https://manuals.plus/ae/1005005827440505
- Jebao, "DC Series Owner's Manual," manualslib.com https://www.manualslib.com/manual/1793401/Jebao-Dc-Series.html
- Jebao, "Submersible Pump Owner's Manual," manuals.plus https://manuals.plus/m/286f7dcd91caecba95ad6c676e51f77970f080ec4316d7dc32682c94f99fbf2c
- Gensou Premium Aquascaping, "Wavemaker Positioning Reef Tank Guide: Random Flow Patterns," gensou.sg https://gensou.sg/wavemaker-positioning-reef-tank-guide/
- Reef Network, "Wavemaker Selection: 5 Critical Mistakes and Flow Rate," reefnetwork.com https://reefnetwork.com/aquarium-wavemaker-selection/
- Gallery Aquatica, "How to Position a Wavemaker for Reef Tank Flow," galleryaquatica.com.au https://www.galleryaquatica.com.au/blogs/tips/position-wavemaker-reef-tank-flow
- Recif'Art, "How to Position a Wavemaker in a Reef Aquarium," recifart.com https://www.recifart.com/en/blog-recifart/aquarium/how-to-position-a-wavemaker-in-a-reef-aquarium
- Hygger, "Functions & Benefits of Large Wave Maker in Reef Aquarium," hygger-online.com https://www.hygger-online.com/functions-benefits-of-large-wave-maker-in-reef-aquarium/
- Bulk Reef Supply, "Choosing a Reef Tank Wavemaker – What to Know & Handy Tips," bulkreefsupply.com https://www.bulkreefsupply.com/content/post/choosing-a-reef-tank-wavemaker-what-to-know-and-handy-tips
- Quantum USA, "Wave Maker," quantumusa.us https://quantumusa.us/blogs/saltwater-glossary/wave-maker
- Aquarium Guides, "Jebao Powerhead Wave Maker Review 2026," aquarium-guides.com https://aquarium-guides.com/jebao-powerhead-wave-maker-reef-review/
- Jebao, "SW8 Propeller Water Pump Wave Maker Instruction Manual," manuals.plus https://manuals.plus/asin/B01N4OJR2V