
Float Valve for RO & RO/DI Systems: Setup and Maintenance
You'll be able to set up an automatic float valve to top off your tank with fresh water, avoiding daily maintenance and keeping your salinity stable.
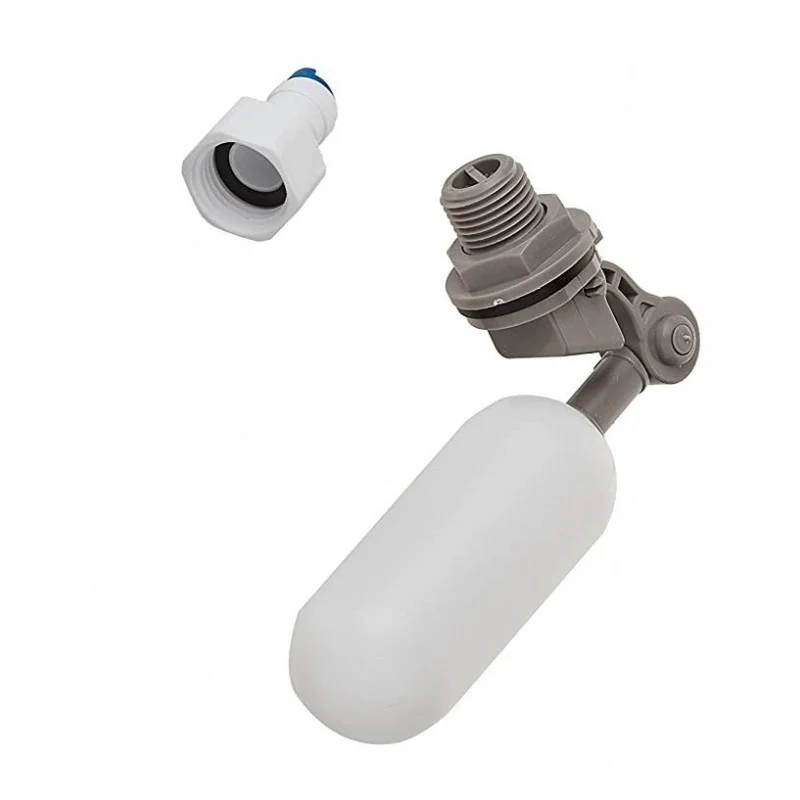
Equipment care · Detailed tutorial · About 8 minutes · Beginner friendly
The key habit: A float valve automatically replenishes your saltwater aquarium with fresh water lost to evaporation, helping you maintain constant salinity levels. Set it up once and check it monthly; it will work for years.
Shop the Float Valve for RO & RO/DI Systems
In this guide
- Why your tank needs a float valve
- Choosing where to put it
- Setting up the valve step by step
- Connecting the water line
- Testing and adjusting the water level
- Monthly care and maintenance
- Fixing problems and what to watch for
1. Why your tank needs a float valve
When water evaporates from your saltwater aquarium, only the fresh water evaporates and the salt is left behind. To maintain a consistent salinity level, you must top off your tank with fresh water. Without topping off, failing to replace evaporated water regularly will cause the salinity in the tank to increase, stressing your corals and fish.
A float valve solves this by working like the one in a toilet. The float acts by raising and shutting the water off when the water reaches your target level, then opening again as water evaporates. This eliminates the need for you to manually pour freshwater into the aquarium each day and because it fills frequently, you will experience a more stable salinity level without any noticeable swings you would get from once-daily manual topoffs.
2. Choosing where to put it
The best place for your float valve is in the last chamber of your sump, typically the return pump section, where the water level fluctuates the most due to evaporation. If you don't have a sump, you can mount it discreetly in a back corner of your display tank.
You can mount the valve two ways: by drilling a hole and using a bulkhead fitting, or by using a magnetic or screw-on mounting. The mounted approach is much easier for beginners and does not require tools.
3. Setting up the valve step by step
Gather before you start
- Float valve (what you've purchased)
- RO/DI water line from your system (usually 1/4" tubing)
- A water storage reservoir (a bucket, bottle, or container holding at least a few gallons)
- Hand tools if drilling: drill with correct bit, adjustable wrench, Teflon tape
1. Stop the water: Turn off the source water feeding your RO/DI unit and relieve all built up pressure in the system by opening the product water line.
2. Drill a hole or choose a mounting spot: In the spot where you want the float valve, drill a ½" (12mm) hole for the mounting stem to pass through, or position your mounting bracket. Pass the float valve's mounting stem through the hole making sure that the rubber gasket is in between the container's wall and the float valve's base.
3. Secure the valve: Install the mounting nut onto the float valve, so that it comes into contact with the container's outer wall. Hand-tighten only; do not over-tighten.
4. Attach the water line: Install the compression fitting's outer nut over the tube, then the compression fitting's ferrule and then the spacer. Push your RO tubing all the way into the float valve until it can go no further.
5. Tighten the nut: Tighten the compression nut hand tight. The compression nut should be hand tight; excessive tightening can cause damage or leaks.
4. Connecting the water line
Your float valve needs to receive fresh RO/DI water from your system. Float valves work in mixing stations and many other applications where automatic filling from an RO/DI system may be necessary. Connect the outlet of your RO/DI system to the float valve using the compression fitting and tubing, or use a Y-fitting if you want to split water between multiple uses.
Never connect the float valve directly to your main tank or sump unless your system includes an auto shut-off valve. Use a separate topoff container placed higher than your sump and plumb a float valve into that with tubing. Make sure your sump can handle the full amount of the container when the float valve fails.
5. Testing and adjusting the water level
1. Turn the water on: Turn on your RO/DI system and watch the float rise as water fills the container or reservoir.
2. Watch it work: As a test just turn your water on and move the float by hand to make sure it's working how you want. When you push the float up, the water should stop flowing. When you lower it, water should flow again.
3. Mark your target level: Mark the desired water level on your aquarium or sump in some manner. The float should shut the water off at this mark. Some float valves have an adjustment screw; you can usually turn a screw on top of the float arm or slide a clip along the vertical rod to raise or lower the shut-off point.
4. Let it cycle: Watch for two to three full cycles to make sure the float opens and closes smoothly.
6. Monthly care and maintenance
Simply shut off the water supply, unscrew the valve cap, and rinse the internal seal and components with fresh water. This prevents mineral buildup that can jam the float.
If your water level is bouncing around, something is likely interfering with the float's movement. A curious snail might be sitting on it, or it could be bumping against a wire or another piece of equipment. Consider building a small baffle or "float guard" out of acrylic to protect it from unwanted visitors and obstructions.
7. Fixing problems and what to watch for
Float won't move: If your float valve won't work, first check for mineral deposits or debris restricting movement. Clean the valve arm and pivot points with vinegar or a descaling solution.
Water level is too high or too low: Check that the compression fitting nuts are hand tight and the tubing is fully inserted. Make sure the nuts are cranked down tight, and the gasket is in correctly. You may need to really tighten yours up before it stops dripping or leaking.
Water leaking from the fitting: The ferrule or spacer may be damaged. Push the tubing into the stem of the float valve until the tubing comes to a complete stop, then slide the compression nut up to the threads capturing the ferrule and spacer. The compression nut should be hand tight.
Tank overflowed (worst case): This catastrophic failure usually happens if the valve gets stuck wide open. The number one rule is to ensure your top-off reservoir holds less water than your sump can safely contain before overflowing. This way, if the valve fails, the sump contains the overflow rather than your floor.
What you notice and what to check next
| What you notice | What to check next |
|---|---|
| Float doesn't move up and down smoothly | Mineral deposits or obstructions; rinse the internal seal with fresh water |
| Water level stays too high or too low | Compression fitting tightness; push tubing fully in and tighten nut by hand |
| Water trickling from the fitting | Ferrule or spacer alignment; disassemble, inspect, and reassemble |
| Float rises but water doesn't stop | Check the compression nut is tight; if still leaking, the internal seal may need replacement |
| Water level drops even though float is full | RO/DI water line is kinked; check for bends, and straighten tubing |
| Valve caps are difficult to remove | Use a cloth or strap wrench to avoid stripping the plastic |
Your care log
Installed on: ______ Location: ______ Reservoir size: ______ gallons
Target water level mark: ______ RO/DI system model: ______
Monthly maintenance dates:
- ______ – Flushed valve cap and seals
- ______ – Checked float movement and adjusted if needed
- ______ – Inspected for leaks and mineral deposits
- ______ – Cleaned around float guard
Sources
Checked October 8, 2026. Reference addresses are plain text.
- Bulk Reef Supply, "How to Install a RO/DI Float Valve," https://www.bulkreefsupply.com/content/post/float-valve-installation
- Bulk Reef Supply, "How to Install a Reverse Osmosis Float Valve – BRStv How-To," https://www.bulkreefsupply.com/content/post/how-to-install-a-reverse-osmosis-float-valve-brstv-how-to
- Aquifarm, "Float Valve Installation – The Complete Guide To Automating Water," https://aquifarm.com/float-valve-installation/
- Reef Builders, "Saltwater Aquarium Maintenance: Topping Off Your Tank With Freshwater," https://reefbuilders.com/2017/03/01/saltwater-aquarium-maintenance-top-off/
- Reef Builders, "5 Tips for Maintaining Stable Salinity in a Saltwater Tank," https://reefbuilders.com/2013/08/14/5-tips-maintaining-stable-salinity-saltwater-tank/
- Bulk Reef Supply, "What is an ATO – Auto Top Off System?" https://www.bulkreefsupply.com/content/post/what-is-an-ato-auto-top-off-system
- Simplicity Aquatics, "How to Choose an Aquarium Auto Top Off," https://www.simplicityaquatics.com/blog/how-to-choose-an-aquarium-auto-top-off/
- The Salty Side, "How to Deal with Evaporation in a Saltwater Aquarium," https://www.thesaltyside.com/saltwater-aquarium-evaporation/
- Fancy Reef, "Reef Tank Top Off Guide for Stable Salinity," https://fancyreef.com/reef-tank-top-off/